 |
| Julia set fractal thing of a quaternion function... I actually don't really know what that means, but it's pretty. |
There are 2.75 ways to store rotations in Unity: (1) quaternions and (2) euler angles (directional vectors are the 0.5, and some math functions secretly take radians instead of degrees, that's the 0.25)...
Euler angles are the typical 0-360 degree system taught in most junior high / high school geometry classes, while radians are in "units of pi" and represent the curvature of a circle. Then there's quaternions, which are scary 4 dimensional representations of a rotation that you may have never heard of / can barely spell! Fortunately, you don't need to know quaternion math in order to work with rotations, Unity will handle conversions for you.
Okay, so first let's explore a most common problem: how do you make stuff look at stuff in Unity?
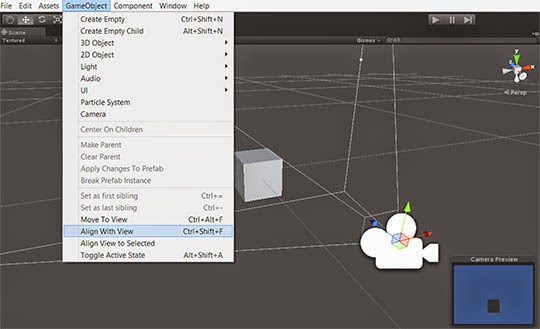
First, if you're working in the editor, don't forget there's a menu option (GameObject > Align With View) that will make your currently selected object copy your scene view's position and rotation. This is very useful with lining up static camera framing or certain camera shots.
There's also a very useful secret keyboard shortcut that will make one thing face toward a point on any collider within the editor: (1) change to the Rotate tool, (2) select an object, (3) hold down shift-ctrl (or shift-command in OSX), (4) left-click and drag from any ring on the gizmo to constrain the facing along an axis, or drag from the outer-most ring to freely rotate on all 3 axes at once, (5) then while still holding down on your mouse, drag toward any point on the surface of any collider in the scene view.
That's all good for building static environments and arranging furniture in your levels. But what if you need stuff to happen in-game, dynamically?
First, always try to use the simplified convenience functions if you can, and take the easy way out. Using transform.LookAt() is often a lifesaver, especially if you want your main camera to look at something (i.e. "Camera.main.transform.LookAt()") or an NPC to look at something (i.e. "securityCamera.LookAt()")
The problem here is that your object will snap to the new rotation without any gradual smoothing in between. I usually use this function when I want to quickly prototype something, or if the look-target is moving smoothly anyway.
If you are animating a humanoid Mecanim character, you'll probably want to use Animator.SetLookAtPosition() instead of calculating and applying the rotations yourself. This is usually how I do any kind of head movement in my games. For example, in my game Succulent, the background dudes nod up and down because they are looking at an invisible gameObject that is moving up and down on a sine wave. Make sure you configure the Animator.SetLookAtWeight() too or else you won't see any head movement; it also has a lot of useful optional parameters you can use to adjust body language and expression, such as how much to influence the body or eyes in the look movement. (Make sure you've configured the Mecanim avatar settings, or that the auto-generated Mecanim avatar is correct.)
(ART ASSET PIPELINE TIP: try to make sure your 3D assets are always pointing along the Z world axis in Maya, so that object's transform.forward is the same as the mesh's forward facing. That way, you won't have cars or characters doing weird sideways crab walks. To achieve this in Maya, rotate the object so that it's facing along the Z world axis (the blue one) and then go to Modify > Freeze Transforms to set that angle as the new default rotation. If you only want to freeze the rotation, and not position or scale, then click on the little box next to the Freeze Transforms menu command.)
Directional vectors are another useful way of thinking about rotations and object facings. If degrees are failing you, you can also turn a gameObject by overriding an object's local directions. Set a gameObject's transform.forward equal to another directional vector to make it rotate and align itself with that vector, same thing with transform.up or transform.right. You can easily compare these directional vectors with Vector3.Angle( ) to measure the degrees between two directions, or use Vector3.Dot( ) to compare how similar two directions are.
 |
| Notice the green and blue axes of rotation are now aligned; the plane has lost the ability to turn to its left or right. |
One annoying part of working with eulerAngles is the wrap-around effect, where values greater than 360 degrees will wrap around to 0 degrees, and lower than 0 degrees will wrap around to 360 degrees. so your object rotations will end up snapping around or your inequality comparisons will be wrong. You also might encounter gimbal lock, where you essentially lose one or more axes of rotation because the axes are aligned with each other. (See left.)
That's where it's useful to learn quaternions, and it's why Unity internally uses quaternions to represent rotations... quaternions are immune to gimbal lock. (For some historical context on the math of quaternions and their use in games, read Nick Bobic's 1998 (!) Gamasutra article "Rotating Objects Using Quaternions" about the camera in Tomb Raider 1, written before quaternions were so trendy.)
To do any calculations with quaternions, you'll often want to convert quaternions to eulerAngles, do your calculations on those, then convert them back to quaternions when actually applying the rotation to the gameObject.
- To convert a quaternion into eulerAngles, access Quaternion.eulerAngles
- To convert eulerAngles back to a quaternion, use Quaternion.Euler(x,y,z)
- To calculate a LookAt() angle without actually applying it yet, use Quaternion.LookRotation(). Here, you won't pass-in the world position to look at, rather you'll have to pass-in the directional vector. Remember "B - A", where A is the observer's current position and B is the position of the look-target.
- To calculate the rotation required to turn from one direction to another direction, use Quaternion.FromToRotation().
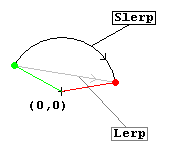 Smoothly blending between different rotations: Okay now let's talk about slerping (spherical interpolation)... when blending between two positions or scales, lerping (linear interpolation) is adequate, but when blending between rotations you'll usually want to slerp instead using Quaternion.Slerp() ... What's the difference?
Well, if you lerp between two rotations, you are blending in a straight line between them. But if you slerp rotations, you blend along the surface of a sphere, so the result is a much smoother transition.
Let's briefly review your rotation toolkit:
- Euler angles.
- transform.LookAt()
- animator.SetLookAtPosition()
- Directional vectors.
- Quaternions.
All of these tools are useful, and they all have different use cases. In projects with complex rotations, you might end up using all of them at some point. In the end, there is no "silver bullet" -- you'll have to figure out what works best for your code style.